Saturday, December 14, 2013

Kitchen Gadget of the Month: December edition

Well....I did my best.  I blogged nearly once a month for a year and shared my favorite kitchen gadgets with you.  If I missed a month (February) or was late, I did make make up for it with additional gadgets.  Amazing...I still have many more to share.  Perhaps I need help.....   

So how to end out this year....???   How about a gadget that can make tortillas as well as crackers?  What?  Is that even possible??


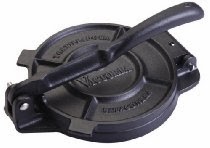
Fear not my friends.  December's Kitchen Gadget of the Month is this mighty fine tortilla press available through my amazon store.  This is a cast-iron, heavy duty press.  You don't want a wimply aluminum one...you need a press that won't fall apart or warp and will last a long, long time. 


Finding a tortilla recipe that tastes great and also stays flexible enough to actually roll around food has been a challenge.  But I have found one that Maria of http://mariamindbodyhealth.com/ created - see below.  These are flavorful and soft and pliable.  Perfect!
 
Finding a way to prevent the tortillas or crackers from sticking to this press was another challenge.  Here's my secret:  take a heavy-duty ziploc bag - I use the freezer ziploc bags.  Cut off the ziploc top and sides.  You want be left with a rectangle of the heavy plastic.  

I then take the plastic and put it inside the press like this:  


Spray with coconut oil on the inside - place your dough on the bottom - cover with the other side of the plastic and press away!  It's easy to open the press and peel off the tortilla or cracker.

Now let's get cooking!


Tortillas


1 1/4 cup blanched almond flour (or 3/4 cup coconut flour)
5 TBS psyllium husk powder

1 tsp Celtic sea salt
2 eggs (4 if using coconut flour)
1 cup water 

In a medium sized bowl, combine the almond or coconut flour, psyllium powder, and salt. Add in the eggs and combine until a thick dough. Add water  and mix until well combined. Let sit for a minute or two until the dough thickens.

Heat a large pan to medium heat with coconut oil or coconut oil spray.  Separate into 10 balls (about 2 inches in diameter).  Place the dough ball on the bottom of your press, on top of the greased plastic.  Close the press and apply firm pressure.  Open the press and remove the tortilla.  Immediately place it on the hot pan.  Saute until very light golden brown.  Flip and bake through.  Remove from pan on cool on paper towels.  Repeat with the rest of your dough balls.

Use as you would regular tortillas!


Sunflower seed crackers

1- 4 ounce bag sunflower seeds -- + 1/2 cup almond flour
1/2 cup shredded cheddar
1/4 cup water
Sea Salt

Preheat the oven to 325°F. Put the sunflower seeds and cheddar in a food processor and process until the sunflower seeds are a fine meal. Add the water, and pulse until the dough is well blended, soft and sticky. Cover a cookie sheet with a piece of parchment paper. 
Roll the dough into small balls - like a 1/2 to 1 tablespoon of dough per ball**.  Place ball on the bottom of y our press, on top of the greased plastic.  Close the press and apply firm pressure.  Open the press and remove your cracker - place onto prachment-covered cookie sheet.  Repeat.  Shake a little sea salt on top of each cracker.  Bake for 10-15 minutes, or until evenly browned. Check often!  

Cool on cookie sheet.  Store in airtight container.
 
**Instead of rolling your dough into little balls, try this gadget:  a stainless steel mini scoop!
Yes, I did give you TWO gadgets this month as well as TWO recipes.  Consider it an early Christmas present.  You're welcome!

Friday, November 29, 2013

Kitchen Gadget of the Month: November Edition

I hope everyone enjoyed their Thanksgiving day.  Mine was spent at my mother's along with my younger brother, an uncle and my sweetie.  Good food, some interesting conversations about family, and just normal weirdness that is a part of our traditional holiday celebrations.  But back to blogging for me now! 

It has been quite some time since I have mentioned my love affair with bacon.  For the newbies out there, plain and simply:  I adore bacon.  As I'm fond of saying, "Bacon is so good that they wrap other meats in bacon".  Nearly everything is better with bacon.  It does seem that lately everyone else is jumping on the bacon bandwagon.  About time they caught up is my opinion of this recent trend.  

How do you prepare bacon?  Most people just take a pound of bacon and fry it up in a pan on top of the stove.  It's easy, fast, and makes for tasty bacon.  I have made it this way myself for years and years.  But, is this truly the best way to prepare bacon?  

Nope.  It's not.  In my not-so-humble opinion, the absolutely best way to make bacon is to bake it in the oven.  Easy.  Pretty quick.  And you can do it nekkid.  Trying frying bacon in a pan on your stove top in your birthday suit.....owie!

Here's what you need to get started:
  1. An oven
  2. A cookie sheet - can even be a gross, baked on, you-would-never-consider-actually-using-for-food-you-would-eat cookie sheet.
  3. November's Kitchen Gadget of the Month:  Cooling Rack - Don't have one??  Get yours from my amazon store today!
Here's what you do:
  1. Preheat oven to 350 degrees F
  2. Place the cooling rack on the cookie sheet
  3. Place the bacon on the cooling rack
  4. Place the bacon, cooling rack, and cookie sheet into oven
  5. Bake for 15-20 minutes until bacon is done - thinner bacon will take less time, thicker will take more.....OPEN THE OVEN DOOR AND LOOK AT IT FROM TIME TO TIME!!  It is a mortal sin to let bacon burn
  6. Remove bacon, cooling rack, and cookie sheet from oven and let cool for only a minute or so
  7. Eat bacon (some people like to put their bacon on a plate first, but this really isn't necessary)
Here's what it looks like before and after baking:


Notice the disgusting cookie sheet?  It don't matter - it's just there to catch the drippings.  (Save those drippings, btw...here's an inexpensive grease strainer)   Notice how the bacon stays nice and flat?  It doesn't curl up in the oven like it does in a frying pan.  In addition, I think the flavor of the bacon is more rich and intense when it has been baked.  

What are you waiting for???  Bake some bacon today!

Thursday, November 7, 2013

Kitchen Gadget of the Month: October edition (just a weeeeeeeeeeeeee bit late)

October was a sad and happy month - and very, very busy.  We lost my oldest brother on October 13 and my mother's health is continuing to deteriorate.   Our bright spot was the wedding of my favorite nephew to a truly lovely girl.  I couldn't be happier for them.

So....here is October's Kitchen gadget of the month.  A mini-donut tin - just in time for all things Pumpkin!


I've talked about getting my sweet fix on in earlier posts.  One of the things I have missed  since going grain and sugar-free is donuts and other pastries.  Lucky for me, I have found ways to make my own....that way I know what's going into the sweets and into my body.

My favorite donut recipe so far is Pumpkin Donuts.  Easy to make plus Amazon makes it easy to buy your own cute mini-donut tin. (Check out my Amazon Store at the top of my blog for a direct link to buy you own!) 

Here's the recipe: 

Pumpkin Donuts

1 1/2 cups almond flour 
1/4 tsp sea salt 
1/2tsp baking soda 
1 tsp ground cinnamon 
1/2 tsp each:  ground nutmeg , cloves, ginger
2 tbls Butter
1/2 cup sweetener of choice (xylitol and erythritol are available thru amazon and my Amazon store
3 eggs 
1 cup canned pumpkin 

In one bowl combine flour, baking soda, salt, and spices. In another bowl, mix butter, sweetener, eggs and pumpkin until smooth. Stir pumpkins mixture into the dry ingredients. Grease you new cute donut tins. Spoon batter into the tins making sure to leave your donut "hole" visible. Bake at 325° for 30-40 minutes. Cool. 

 Need it sweeter yet?? Try this cream cheese frosting: 

Cream Cheese Frosting

4 oz cream cheese, softened
2 tbls milk 
3 tbls Swerve Powdered Sweetener (to taste) 

 Stir until smooth and frost away!

Monday, September 30, 2013

Kitchen Gadget of the Month - September edition

As much as I love to cook and bake, I hate, hate, HATE cleaning up after myself.  What??!??  You too??

I used to use this scrubby pad exclusively.  I'm sure you're familiar with them...how they grab all of the baked on ooey, gooey, ucky stuff and never ever let go.  Sure they work, but then you end up with something that looks far worse than your dirty dish or pan.

I am also a firm believer in soaking my dishes that have dried on food....sometimes I soak for several days.  Still the food doesn't magically lift off...gotta scrap and rub and scrub.

What to do??  This month's kitchen gadget is a life saver and another gadget in the long line of gadgets introduced to me by my mother-in-law, Vera.  Vera's love of kitchen gadgets even surpassed my own.  She had everything imaginable.  Since she has passed, I have inherited several of these goodies and think of her fondly each time I use one.

But the one I use nearly every day is this Pot Scrubber by Lodge - you know, the cast iron people.  These pot scrubbers are made of Polycarbonate and the design safely scrapes without scratching - including non-stick surfaces. Each corner is a different design to easily clean any type and size of cookware plus a flat side for the bottoms of pans.  They are simply amazing - can't imagine cleaning without them now.  Grab some for yourself today at my amazon store - you get two for a very low price:
Lodge Pot Scrubber

Friday, August 30, 2013

Kitchen Gadget of the Month: August edition

It may be August 30th, but it's still August!!  

Today I'll be giving you something for your sweet tooth.  Homemade chocolate candies.  Yes...candy on this blog!  Go figure, eh?

The key point here is HOMEMADE.  Making chocolates with extra virgin coconut oil is a healthy way to satisfy your lusting for something sweet and chocolatey.  Plus, it's just kinda fun.

There are many benefits of coconut oil in your diet.  To quote several sources on the web, Coconut Oil contains a unique combination of fatty acids -- this combination has powerful medicinal properties.  Rich in lauric acid, coconut oil can kill bacteria, viruses, and help prevent infections.

Coconut oil has gotten a bad rap in the past because it contains saturated fat. In fact, coconut oil is one of the richest sources of saturated fat known to man.  However, new data is showing that saturated fats are harmless.  Many new (and even older) studies on hundreds of thousands of people prove that the whole eating saturated “artery-clogging” fat is a myth based on faulty research.

Coconut oil can also help you lose weight.  Yes, lose weight.  I have read about farmers feeding their cattle coconut oil in an attempt to fatten them up.  But quite the opposite occurred...the cows lost weight.  Coconut oil can increase your energy expenditure helping you lose more fat.  It also curbs your appetite so you may end up eating less.

So there.  Eat your coconut oil.  The most fun way is with homemade chocolate candies.  There are tons of recipes for this on the web - a lot of them are called Chocolate Delights.  Too cheesy even for this Wisconsin girl, so I just call them CANDY.  Period.

Make your own today in our Kitchen Gadget of the Month:  Silicon Candy Mold     This mold is super fun to work with...fill them up, freeze the candy, and then just pop them out easy-peasy!


Candy

1 cup dry cocoa (I use dark cocoa)
Sweetener to taste (I start with 1/2 cup)
1 cup extra virgin coconut oil
1 stick unsalted butter
4 ounces cream cheese 
4 ounces unsweetened peanut butter


Sift cocoa and sweetener together into a sauce pan.  Over medium heat, add coconut oil, butter, cream cheese and peanut butter.  Stir constantly until coconut oil, butter, cream cheese, and peanut butter are melted completely and mixture is velvety smooth.

Place mold(s) on a cookie sheet.  Pour chocolate mixture into molds and freeze until solid.  Pop them out and store in refrigerator.  Candies will melt very quickly because coconut oil has a melting point of 76 degrees F.  Keep them cool!

You can also pour them into any plastic container.  Once it is solid, you can remove the block of chocolate and cut it into bite-sized pieces.


Saturday, August 3, 2013

Kitchen Gadget of the Month: July Edition


ya.....ya.....ya....I know it's August.  Been super uber busy at work these days - I'm part of an IT staff and we're changing our email program this weekend.  I've been spending most of the month traveling around to our various sites around the state of Wisconsin training employees on how to use the new program.  I'm afraid my blogging was affected.

So....here is my gadget for July:  a Mandoline!  No, no, no....not something you play - but something you use to slice up veggies nice and neat and even.

Love this Mandoline.  It comes with it's own storage box and 3 double sided cutting blades for 6 different cutting options.

But.....be careful!  These blades are SHARP!  I have shed a little blood using this myself, so I know first hand (or is that first finger?).  Follow this link to get your own from my amazon store:  Progressive International Mandoline
So....now we have our handy-dandy mandoline....let's make something!  Here is a tasty salmon recipe that is quick and easy - especially with our new gadget!


Teriyaki Salmon with Zucchini

Teriyaki sauce
2 (6-ounce) salmon fillets
Sesame seeds
2 small zucchini, thinly sliced
4 scallions (or green onions), chopped
Olive oil
Place salmon in plastic bag with teriyaki sauce - marinate for 20 minutes in refrigerator.  Toast sesame seeds in a large nonstick skillet over medium heat until just lightly browned.  Remove and set aside.

Remove salmon from bag and discard marinade.  Add enough oil to coat skillet, add salmon and cook for 5 minutes on medium-high heat.  Turn and cook for 5 minutes more.  Remove from skillet and keep warm.  Add 1 tsp olive oil, zucchini and scallions to skillet and saute until lightly browned.  Add 2 tablespoons teriyaki sauce and sesame seeds.  Remove from heat and serve over salmon.